

I think it’s pretty safe to say that more and more people are getting into creative pursuits these days. With more time being spent at home, many of us are unlocking our hidden artistic skills and having a lot fun in the process. And, let’s be honest, the fun is really the most important part! Hand embroidery has definitely been a part of that boom. But as with pretty much any activity, coming at it as a beginner can sometimes be intimidating. My goal at Paraffle is to make embroidery easy and accessible to everyone, be it through my kits, video tutorials, or my blogs. So, I thought I’d put together a quick list of some of my top tips for hand embroidery beginners to think about that will hopefully make getting started feel totally doable.
1. Start simple
This one can actually mean a couple of different things because with any embroidery piece there are always multiple aspects to consider. The two main ones I have in mind here are size and design. I’d recommend starting with something fairly small, so you don’t feel overwhelmed by the amount of stitching you need to do in order to reach the end. I’d also suggest choosing a fairly basic design. Perhaps something with just a couple of basic embroidery stitches like back stitch or satin stitch that will help you get a feel for just holding a needle, pushing and pulling it through your fabric, and how you like to hold a hoop.

2. Choose a design you love
I’ll keep this one short and sweet because it’s pretty obvious, but still worth mentioning! You’re more likely to keep going when some of that inevitable beginner’s frustration hits if you know you’ll love the final result. It’s that simple!

3. Find your motivation
If you love your design, but are still really feeling the frustration, tuning in to a motivation can be another great way to keep going when things get hard or goes wrong. Maybe it’s because you really want to learn a new skill, to reduce your screen time or because you want to make a special gift. Just for fun is also totally a valid reason! It doesn’t have to be deep, it just has to help you stay with your project.
4. Research your equipment
One way to reduce the overwhelm of heading into a shop or looking online and being confronted by so many product options is to do a bit of research beforehand. If you want to buy all your components separately for a fully bespoke piece, then it really is worth spending a bit of time looking into what to get so that you can get off to the best and most comfortable start. It doesn’t have to be super in depth, but just enough so you know what kind of fabric you want, which hoop style suits your end goals, and which threads to go for. You might also want to watch a few videos of the most basic stitches so you know what the actions look like and what the end result should resemble.

5. Use a kit
That said, if all that research feels like more than you’re up to right now, then you could just go ahead and buy a kit. That way, everything you need comes together. No need to overthink all the best options, your kit maker has already done that for you! Feel free to browse my kits here or if you’d like to explore some different style options before making your decision, Etsy is a great place to start.

6. Get inspired
Whether you decide to go for a kit or to go it alone, you’ll probably need to have an idea of what you want to stitch in order to actually stitch it! Some people know their personal artistic style well, while others might need a bit of inspiration to point them in the right direction. In that case, a little design research can really help. I find making mood boards can be super useful and are also just really enjoyable as a creative exercise! And, to be honest, even if you know roughly what you want to make, I’d suggest doing this anyway. You’ll come across so many different styles, techniques and colour combinations that you’ll for sure end up even more fired up to sew than you already were! It can also help give you goals to work towards if you see a piece that feels a bit above your level for now. If you want somewhere to start, I’ve got some themed lists that might help here. Instagram and Pinterest are, of course, absolute gold mines, too. I’ve many different boards on my Pinterest, if you fancy a look!
7. Find a craft community
Be it on forums, social media, between friends and colleagues or via local in-person groups, you don’t have to look far to find community in the crafting world. Now more than ever, with many people experiencing feelings of isolation, these communities can be absolute game-changers. Finding a like-minded group of people who offer help and advice, share progress and inspiration and act as your cheerleaders when you make something great, is really something quite amazing. I know of international friendships that have blossomed through online craft communities and sewists that send each other gifts. How lovely!
8. Find a local store
This one sort of links with the idea of finding community, but with a more practical, supply-based focus. I’ve always found independent craft stores to be full of friendly, super helpful people. Everyone there shares a love of craft and I know friends who have even been told to bring knitting or sewing in if ever they get stuck. Such invaluable help and support is something not to be forgotten. Aside from just general loveliness, you’ll be able to get any question about supplies answered easily, and you’ll be supporting a small business when you buy from there.
9. Don’t rush it
It’s one danger of embroidery that many sewists learn the hard way. Thread can have a tendency to get tangled up, especially if you use super long lengths (side tip – don’t be tempted to cut your thread too long. It may feel like you’ll waste less or save time by not having to rethread, but shorter lengths are much more manageable). If you’re rushing through your piece and trying to do things too fast, tangles are pretty much a given. And while sometimes they can be sorted out, other times there’s no choice but to just chop them out. And no one wants that! True, sometimes you can find yourself in a flow where every stitch comes quickly and correctly but get ahead of yourself and you may well be asking for trouble, especially as a beginner. Just take it one stitch at a time and you’ll get there!

10. Just get started!
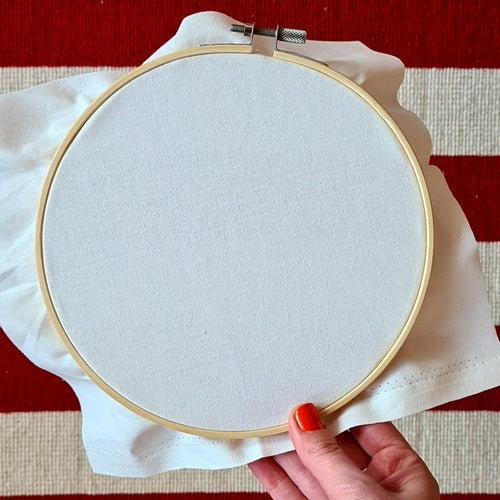
With all that said, one of the best things to do is just get on with it! Sure, this tip is a bit of a classic, but that’s for a good reason. It’s common to overthink when you’re a beginner and even end up with what I’m going to call blank hoop syndrome – a bit like writers get blank page syndrome. All that empty space feels scary. But sometimes you really do just have to start. Don’t worry about it being perfect. If you do mess up, which we all do, then it’s really not a big deal. Everything can be dealt with. It’s a practice, one that’ll improve as you go.
These points are all seemingly simple, but I often think that that’s all it takes to help us get over that first hurdle of trying out something new. If you’re keen to get started but want to learn a bit more first, I have all sorts of other, more in depth tips and tutorials on my blog, so do have a browse. And if you have any questions, please feel free to drop them in the comments below. I’d love to help if I can!


Leave a comment (all fields required)